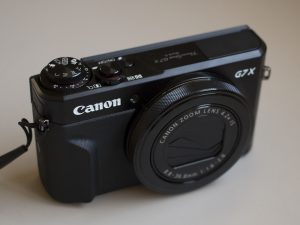
Canon PowerShot G7X Mark II
I finally came around to the idea that I need a high-quality point-n-shoot camera. The reason? None of my cameras are compact enough, and my phone’s camera doesn’t produce art-quality photos.
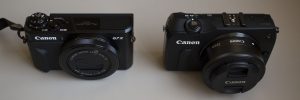
Up until now, my most compact camera has been my Canon EOS M. The body of the EOS M is quite compact, for a system camera. With the 22mm pancake lens, it makes a great, unintimidating camera to take to parties. It has an APS-C sized sensor, so it is capable of some fairly shallow depth-of-field and performs reasonably well in low light. However, it is not a pocket camera. With the lens attached, it just doesn’t go into a pocket. It doesn’t pack conveniently in the pocket of a backpack, either. It’s even more awkwardly shaped with the zoom lens, and the zoom lens is not a fast lens, so you lose a lot of the shallow depth-of-field anyway.
I have been using the camera on my phone much more. I upgraded to a Samsung Galaxy S6 active almost a year ago, which has a surprisingly good camera. It is capable of sharp and detailed photos and has good tonality characteristics. And of course it is compact and convenient, always at hand and fits in any pocket. However, the photographs it produces are not quite art-quality. The primary problem is that there is just far too much JPEG compression. However, the totally flat depth-of-field is also an issue. I used it quite heavily during my summer vacation, and I captured many good photos. However, I found myself wanting to display some of those photos in ways that reveal the quality limitations of the camera, and that has left me disappointed.

I settled on the Canon PowerShot G7X Mark II. It is an “advanced” or “enthusiast” point-n-shoot camera. The feature that makes it so is the 1.0″ sensor. That’s quite large for a point-n-shoot, and it provides an appreciable amount of shallow depth-of-field, as well as better performance in low light. The camera is only slightly smaller than the EOS M body, but the lens retracts, making it a truly pocket-size camera. Furthermore, the lens is faster than the EOS M lenses and offers a longer zoom range.

This camera has WiFi and NFC, as well as an Android app. This offers me a workflow that is great for use in the field. Without using a computer or a card reader, I can transfer photos from the camera (even if they were shot RAW) and post them online using my smart phone. I am looking forward to using this feature during my upcoming hunting/camping trip. Another feature that makes this camera road worthy is the ability to charge the battery internally via USB. I can charge the camera in my car or from a big USB powerbank without purchasing an expensive car charger.

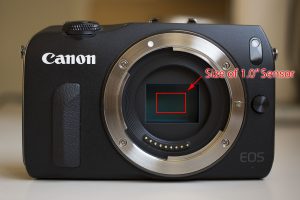
The size of a “one inch” sensor is an interesting matter of discussion. It isn’t one inch. In fact, the size of any sensor expressed in inches, including the four-thirds sensor, is a lie misleading. See “optical format“. Basically, the real size is about two-thirds of what is actually stated. The actual size of a 1″ sensor is 13.2 × 8.8 mm, which is obviously nowhere near an inch in any direction. In the photo above, the red outline represents the size of a 1” sensor in comparison to an APS-C sensor (the sensor format used in the majority of Canon DSLRs). It is about 59% of the size of an APS-C sensor. This smaller sensor results in deeper depth-of-field than an APS-C camera, but it is still much larger than a typical point-n-shoot and certainly larger than the sensors found in phones.
One of the interesting features is the internal ND filter. It has a 1/8 (3-stop) ND filter that can be enabled, disabled, or set to auto. At first, I was thinking of this as a way to improve shallow depth-of-field, since it allows the aperture can be opened up while leaving all the other exposure parameters unchanged. I use screw-on ND filters on my DSLRs for this purpose, especially when using studio strobes. However after thinking about it more, I realize that the ND filter mostly just makes up for the shutter speed limitations, which only go down to 1/2000, as opposed to the 1/8000 shutter speed I am accustomed to on DSLRs. Still, to maximize shallow depth-of-field, I find that I can use aperture priority on the maximum aperture and set the ND filter to auto, letting the camera figure out how best to accomplish the exposure.
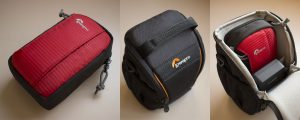
Update: I am always looking for just the right bag or case for any equipment I am likely to carry into the field. Here’s what I came up with. The Lowepro Tahoe 25 II is just the right size for the camera. It is padded on all sides, and has a rigid wall between the main compartment and the front pocket, which I figure provides extra protection for the lens. The pocket has room for spare batteries, cards, even a Joby Micro Tripod. There is a belt loop in back. I feel confident tossing the camera in this case into my backpack with all my other gear. The other case is a Lowepro Adventura SH 100 II, which Crutchfield sent free when I ordered the camera from them. It’s a little big for the camera, but it turns out to be ideal for storing the camera with the charger and whatever other accessories I have for it (the micro-USB cable, for example, though I never use it). The smaller case fits into the larger case just perfectly.
Update: I took the camera hunting with me this past week. Everything worked out as planned. In the little case, it was no problem carrying it my backpack. Battery life, USB charging, and transferring images to my phone all made me happy. I am finding that shallow depth-of-field, especially with closer shots, is even better than I had anticipated. I did sometimes struggle with getting the focus I wanted, but there are multiple ways to control focus, and it was mostly an exercise in trying different methods (touch-to-focus and using the control ring for manual focus were the usual solutions). Also, it is not possible to get Adobe CS6 to process RAW images from this camera, and I finally gave in and upgraded to CC, which has upset my world notably.
